Good evening everyone,
You may remember that I started making Christmas decorations early last year.
I’ve finally got around to putting a photo tutorial together for this one. All you need is two small pieces of fabric, a button, ribbon, thread and a needle. I made mine on the Green Mean Sewing Machine but you could make some by hand if you wish.
Cut one circle of about eight inches diameter from each of two contrasting fabrics. I drew around a pan lid but you could use a small plate etc.
Pin right sides together.
Sew a quarter inch seam around the edge, leaving about two inches open for turning.
Turn inside out and smooth the edges with a pen or other blunt instrument.
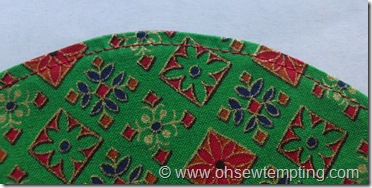
My opening is at the top of this photo.
Turn the raw edges of the opening to the inside and hand sew to close it. Then top stitch one quarter of an inch all the way around the edge.
Fold in half.
Fold in half again. Finger press the folds at the very edges of the circle. You will need the positions of the folds for the next steps.
Sew through the fold positions from front to back close to the edge.
Sew through a couple of times to secure it. Don’t break the thread.
Re-fold, if necessary, to find the next stitch point.
Now sew through the right fold from front to back.
Pull the thread until the right hand side meets the previous stitches. Secure with a couple of stitches. Don’t break the thread.
Now sew through the left fold from front to back.
Pull the thread so it comes together like this.
Secure with a couple of stitches. Don’t break the thread. Flatten the back to make a square with the four petals standing up.
Open out one of the petals.
Turn it to the back.
Tidy it up. Repeat with the other three petals.
You’re almost there…
Sew a button to the centre and add some pretty ribbon to the top for hanging then you are done.
Off you go and make a few for your Christmas trees now. Has anyone been Christmas shopping yet?
I hope you enjoyed the tutorial ![]()
Avis x


katechiconi
/ October 18, 2014Clever and pretty. But as I’m lazy, I might try making them of felt, spray basted together to avoid stitching and turning…
Oh Sew Tempting
/ October 21, 2014That’s not lazy! It’s inventive 🙂 I made this one in 15 minutes so the race is on 😉
Jule
/ October 18, 2014I bought a mini stollen (cake) today :blush: No more Christmas shopping for me as our family have agreed a couple of years ago not to give presents to each other. Except for my nephews, of course, who love some funds in a handmade card. 😉
Oh Sew Tempting
/ October 21, 2014We don’t go mad at Christmas and our family is very small so that’s a bonus 🙂 I don’t even like Christmas trees but I put up with one in the house. You know how it is 😉
knettycraft
/ October 18, 2014Hello Avis, I hope you are well. Thank you for your very detailed tutorial. I think I’ll try to make it as a Christmas giveaway for friends & family. Kind regards Annett
Oh Sew Tempting
/ October 21, 2014I gave some away last year and everyone really liked them. There are also some Christmas stars in an earlier post from last year if you are interested. I didn’t do a full tutorial but I’m sure you could work out how to make them 🙂
mtetar
/ October 18, 2014Awesome tutorial Avis I need some fabrics/scraps to try making some. They’re very nice not to at least make one. Blessings Always, Mtetar
Oh Sew Tempting
/ October 21, 2014I need to buy more buttons so I can make more this year. They are so easy to do. Enjoy 🙂
sonyamayhem
/ October 19, 2014Great tute Avis – I might even attempt a couple!!
Oh Sew Tempting
/ October 21, 2014That’s great news! Good luck 🙂
claire93
/ October 19, 2014thanks for the “how to” tutorial – I might give it a go ^^
Oh Sew Tempting
/ October 21, 2014You can do it 🙂
rutigt
/ October 21, 2014On my way to sew Christmas Decorations 🙂 So nice!!!
Gun, Sweden
Oh Sew Tempting
/ October 21, 2014I’m sure they’ll be fabulous 🙂
Granny Maud's Girl
/ October 24, 2014I love the tutorial, but the idea of Christmas looming again is simply frightening. I am sure it was June just a minute ago.
Oh Sew Tempting
/ October 27, 2014I know what you mean but I have so little crafting time at the moment I need to be prepared 🙂
laura bruno lilly
/ October 25, 2014Ahhh, this one is definitely a keeper. Thanks for the early gift-craft tutorial.
peace
Oh Sew Tempting
/ October 27, 2014I’m pleased you like it 🙂
dezertsuz
/ October 30, 2015Oh, my goodness! Here I need an idea for a Christmas ornament and there your post has one! Thank you for the excellent tutorial and many photographs.
Oh Sew Tempting
/ October 30, 2015There’s another ornament here (in case you haven’t already spotted it).
Enjoy 🙂
Deb
/ December 10, 2019I am going to try these. Very nice.
Oh Sew Tempting
/ August 16, 2020Sorry for such a late reply! I hope they turned out well 🙂
Anonymous
/ October 26, 2021Thank you for sharing this simple but effective decoration.
Oh Sew Tempting
/ December 3, 2021You’re very welcome. I hope they work out well for you 🙂
Laurpud
/ November 25, 2021Thank you, this is exactly what I was looking for!
Oh Sew Tempting
/ December 3, 2021You’re very welcome 🙂 I hope they turn out well for you.