
Here is the first part of the patchwork tutorial to make this quilt top.
The finished size is approximately 45″ x 59″.
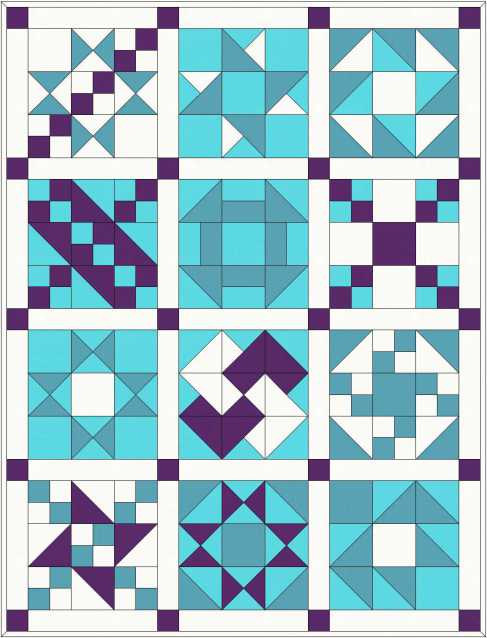
I have chosen four colours to make my quilt but if you want a more scrappy look just raid your stash!
If you’d like to use four colours:
Fabric requirements:
White 1 2/3 yards (assuming fabric has a usable width of 43″)
Light 2/3 yard
Medium just over 1/2 yard
Dark 1/2 yard
PLUS wadding and backing fabric.
I will be working with White, Robin’s Egg, Teal and Purple from the Moda Bella Solids range.
Cutting instructions:
A “strip” means a strip of the given size cut across the width of fabric.
White
- Cut seventeen 2 1/2″ strips. Put six strips to one side for the binding. From another strip cut one rectangle 12 1/2″ x 2 1/2″ and four squares 2 1/2″ x 2 1/2″. From each of the remaining ten strips cut three rectangles 12 1/2″ x 2 1/2″ and two squares 2 1/2″ x 2 1/2″.
- Cut one 4 1/2″ strip. From this cut nine 4 1/2″ x 4 1/2″ squares.
- Cut one 4 7/8″ strip. From this cut eight 4 7/8″ x 4 7/8″ squares.
- Cut one 5 1/4″ strip. From this cut four 5 1/4″ x 5 1/4″ squares.
Light
- Cut two 2 1/2″ strips. From one of these cut four rectangles 2 1/2″ x 4 1/2″ and from the rest of these cut eighteen 2 1/2″ x 2 1/2″ squares.
- Cut one 4 1/2″ strip. From this cut nine 4 1/2″ x 4 1/2″ squares.
- Cut one 5 1/4″ strip. From this cut six 5 1/4″ x 5 1/4″ squares.
- Cut two 4 7/8″ strips. From these cut thirteen 4 7/8″ x 4 7/8″ squares and CAREFUL two 4 1/2″ x 4 1/2″ squares.
Medium
- Cut two 2 1/2″ strips. From one of these cut four rectangles 2 1/2″ x 4 1/2″ and from the rest of these cut eighteen 2 1/2″ x 2 1/2″ squares.
- Cut two 4 7/8″ strips. From these cut fifteen 4 7/8″ x 4 7/8″ squares.
- Cut one 5 1/4″ strip. From this cut four 5 1/4″ x 5 1/4″ squares and CAREFUL three 4 1/2″ x 4 1/2″ squares.
Dark
- Cut three 2 1/2″ strips. From these cut forty four 2 1/2″ x 2 1/2″ squares.
- Cut one 5 1/4″ strip. From this cut three 5 1/4″ x 5 1/4″ squares.
- Cut one 4 7/8″ strip. From this cut six 4 7/8″ x 4 7/8″ squares and CAREFUL one 4 1/2″ x 4 1/2″ square.
If you prefer to use scraps, here are the number of patches of each size and colour you will need.
| White | Light | Medium | Dark | |
| 2 ½” x 2 ½” | 24 | 18 | 18 | 44 |
| 2 ½” x 4 ½” | 0 | 4 | 4 | 0 |
| 2 ½” x 12 ½” | 31 | 0 | 0 | 0 |
| 4 ½” x 4 ½” | 9 | 11 | 3 | 1 |
| 4 7/8” x 4 7/8” | 8 | 13 | 15 | 6 |
| 5 ¼” x 5 ¼” | 4 | 6 | 4 | 3 |
PLUS 6 binding strips of 2 ½” across the width of fabric.
I will be using these fabrics

and here they are cut, labelled and ready to sew.

Part 2 will be a photo tutorial to make the first block. You can find it here.


rutigt
/ August 28, 2012No time to comment….must start cutting!!!!!!
Gun, Sweden
Oh Sew Tempting
/ August 28, 2012Brilliant! It will be lovely to quilt along with you 🙂 Avis x
Teje
/ August 28, 2012Hi Avis! You have done great job! So organized and well explained and I love the colours you have chosen! x Teje
Oh Sew Tempting
/ August 28, 2012Oh Teje…I have wrestled with the presentation for a whole week! I wanted my fractions to have the numerator on top of the denominator. I wasn’t happy with any of several formats I tried so I’ve settled for these, reluctantly 😦 Now the fun part can begin 😀
witchylin
/ August 29, 2012This is going to be a lovely quilt. The colours you are using only slightly differ from my abstract quilt. You have white and I had lilac, so I just know those shades together will look amazing. It is certainly going on my “To do soon” list. Lots of fun deciding on colours and choosing plains or patterns. I am leaning towards plain so the sample blocks can be seen to better effect. Maybe autumn shades.Mmmmmm something to think about while I am ironing. 😉
Oh Sew Tempting
/ August 29, 2012I love the jelly roll you made up and have one squirrelled away for myself to use at some point 😀 I don’t know what it is about white… I just love to sew with it…but it has to be bright white. I also like some of the white on white fabrics. Autumn shades sound nice. I’d even try white with those 🙂
ddinstitches
/ August 29, 2012Great tutorial! Love the colours too.
Oh Sew Tempting
/ August 29, 2012Thank you very much 😀
Occasional Crafter
/ August 29, 2012Wow! You’ve really set yourself a challenge. Looks like it will be a great set of tutorials though.
Oh Sew Tempting
/ August 30, 2012Thank you! If there is no challenge, there is no point 🙂 I’m doing it to document the process for me really but if anyone else finds it useful in the future then that is a bonus. I’ve made and photographed the first block so Part 2 will be coming soon.